Saturday, March 13, 2010
Tuesday, February 16, 2010
Great Needlepoint Stash Buster

Our goal at the shop in 2009 was to finish the needlepoint perpetual calendar started in December of 2008.
Except for black and white Designers Dream, and a few background colors, all the fibers used on the completed project were from our stash of mixed fibers. Since the pieces are small it was easy to find a few strands to match the painted colors.
This project was so much fun (and we still have LOTS of stash fiber left) that we are now working on an Advent calendar for December of this year.
Sunday, February 14, 2010
Needlepoint Classes


Embellishment Class
We are pleased to welcome MaryLu Leger as our canvas embellishment teacher. MaryLu was a former shop owner in Las Cruces, New Mexico and has taught locally at Quail Run in Scottsdale. She has studied with many national teachers, and brings a wealth of knowledge and creativity to her classes.
Classes are held every Wednesday from 1 - 3 PM $15.00 per session
Your choice of project
Please call ahead to reserve a space as class size is limited.
Pictured are some examples of how you can transform your painted canvas into a masterpiece.
Sunday, November 16, 2008
Queedlepoint?
Sandy Budlong came to the shop to purchase Designer's Dream and Burmilana to use on her "penny rug"quilting project and we fell in love with this look! Could it be translated into needlepoint - or vice-versa?
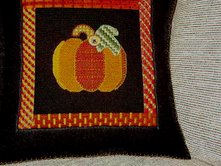
She used our #1009 Christmas tree pattern to create a quilted pillow, and we adapted her techniques to make our #1039 look like a quilted pumpkin.
The "secret" to achieving this look is to choose a relatively simple design and to use either basketweave or any small slanted stitch on the areas that are to be outlined in blanket (or buttonhole) stitch.
To finish this "Thanksgiving" pillow, our finisher actually felted the wool fabric (like the quilters do) and seamed it on the outside. Then we added buttonhole stitch around the outside edge.
She used our #1009 Christmas tree pattern to create a quilted pillow, and we adapted her techniques to make our #1039 look like a quilted pumpkin.
The "secret" to achieving this look is to choose a relatively simple design and to use either basketweave or any small slanted stitch on the areas that are to be outlined in blanket (or buttonhole) stitch.
To finish this "Thanksgiving" pillow, our finisher actually felted the wool fabric (like the quilters do) and seamed it on the outside. Then we added buttonhole stitch around the outside edge.
Tuesday, June 24, 2008
Sandy V. Stitch
NEW STITCH????????
Sandy Vanasek, one of our beginning needlepoint students, accidently created this stitch while attempting to do the Nobuko stitch on her Christmas sampler.
We loved the way it looked, and charted the variation before she ripped to correct it. We found that it could be left open or filled with Continental or long upright crosses over one thread. When stitched with an overdyed fiber it resembled grass, so we added a few French Knot flowers in the open spaces.
The stitch is easy to do, compensates well, and makes an attractive overall background pattern.
The new stitch chart is on the bonus page of our website, so if you would like to try it please feel free to print the graph.
Sandy Vanasek, one of our beginning needlepoint students, accidently created this stitch while attempting to do the Nobuko stitch on her Christmas sampler.
We loved the way it looked, and charted the variation before she ripped to correct it. We found that it could be left open or filled with Continental or long upright crosses over one thread. When stitched with an overdyed fiber it resembled grass, so we added a few French Knot flowers in the open spaces.
The stitch is easy to do, compensates well, and makes an attractive overall background pattern.
The new stitch chart is on the bonus page of our website, so if you would like to try it please feel free to print the graph.
Monday, May 19, 2008
When Lolly Werner said she wanted to needlepoint a large "pouff" (or ottoman) for her bathroom we were really challanged to design something that would look good in the round and viewed from above.
She wanted fish, so after some research we decided to do a tropical motif that included not only fish, but a variety of sea life. The painted canvas ( on the Custom Design page of our website) would make a marine biologist cringe, as we used fish, shells, and plants from a variety of oceans. However, the goal was to make it colorful and interesting so we included anything that looked good.
Lolly stitched the fish and sea life in basketweave (and got to use a lot of her fiber stash!), and then was left with a huge expanse of background. Since this was such a large piece (30" in diameter), more basketweave would have been boring , but she needed to use a stitch that would also be durable.
To solve the problem we divided the canvas into quadrants and found a four-way Bargello pattern that simulated waves. The result looked perfect and she finished in record time.
Eric, the upholsterer, then built the ottoman using Lolly's choices of fabric and beaded trim. She loved the way this turned out, and we think it's absolutely smashing!!!
She wanted fish, so after some research we decided to do a tropical motif that included not only fish, but a variety of sea life. The painted canvas ( on the Custom Design page of our website) would make a marine biologist cringe, as we used fish, shells, and plants from a variety of oceans. However, the goal was to make it colorful and interesting so we included anything that looked good.
Lolly stitched the fish and sea life in basketweave (and got to use a lot of her fiber stash!), and then was left with a huge expanse of background. Since this was such a large piece (30" in diameter), more basketweave would have been boring , but she needed to use a stitch that would also be durable.
To solve the problem we divided the canvas into quadrants and found a four-way Bargello pattern that simulated waves. The result looked perfect and she finished in record time.
Eric, the upholsterer, then built the ottoman using Lolly's choices of fabric and beaded trim. She loved the way this turned out, and we think it's absolutely smashing!!!
Subscribe to:
Posts (Atom)